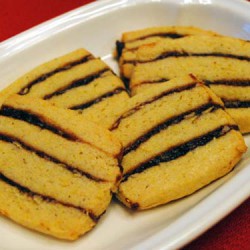
Striped Icebox Cookies
These Striped Icebox Cookies look so unique and festive, I thought they’d be perfect for our cookie baking day. The dough has yellow cornmeal, which was interesting, so I couldn’t resist giving them a try. I was in charge of the filling and mom handled the dough. See how I planned that? The beauty of these cookies is they don’t have to be perfectly square. They look more homemade to me and show a lot of love was put in to them.

So, how’s it taste?
They weren’t the easiest cookies to make and there’s a lot of freezing in between steps that we found unnecessary. You can use any red jam, or any color jam, you like. I used cherry for mine. The cornmeal added a crunch to the cookies, yet they still stayed a little chewy from the jam stripes. They taste really, really good. It’s hard to detect the flavor of the jam, but it gives such a sweetness to balance out the not-so-sweet dough.
Other goodies from Cookie Baking Day 2010:
Almond Macaroons
Buttery Pecan Rounds
Crunchy Muncher Cookies
Mint Chocolate Chip Cookies
Chunky Peanut, Chocolate, and Cinnamon Cookies
Chewy Chocolate Gingerbread Cookies
Cream Cheese Spritz Cookies
Apricot Sour Cream Tea Cookies
 Print
PrintStriped Icebox Cookies
Martha Stewart’s Cookies
makes 3 dozen
Ingredients:
Filling
3/4 cup dried cherries
1/3 cup cherry jam or other red fruit jam
1 tbsp. sugar
1/8 tsp. pure almond extract
Dough
1 1/4 cups all-purpose flour
1/2 cup yellow cornmeal
1 tsp. baking powder
1/4 tsp. coarse salt
1/2 cup (1 stick) unsalted butter, room temperature
1 cup sugar
1 large egg
1 tsp. pure vanilla extract
Directions:
1. Make filling: Process cherries, jam, and sugar in a food processor until coarsely pureed. Transfer to a small saucepan. Bring to a boil over medium heat, stirring occasionally. Remove from heat, and stir in almond extract. Let cool completely.
2. Make dough: Whisk together flour, cornmeal, baking powder, and salt in a bowl. Put butter and sugar in the bowl of an electric mixer fitted with the paddle attachment; mix on medium speed until pale and fluffy, 2 to 4 minutes. Mix in egg and vanilla. Reduce speed to low. Add flour mixture; mix until just combined.
3. Transfer dough to a work surface. Divide into four equal pieces. Roll one piece of dough between two sheets of parchment paper to a 3 1/2-by-9-inch rectangle about 1/4 inch thick. Repeat with the remaining dough pieces. Transfer with parchment to a baking sheet, and freeze 30 minutes. (We’d suggest freezing for a bit less. The dough was really hard and stuck to the parchment after 30 minutes.)
4. Assemble cookies: Remove top pieces of parchment. Spread 1/3 of the filling evenly over one rectangle. Top with another rectangle; remove parchment. Repeat with remaining filling and rectangles, leaving the top rectangle uncoated. Wrap in plastic, and freeze 1 hour.
5. Preheat oven to 350 degrees. Trim dough to 3 1/4-by-8 1/2-inch brick. (We didn’t trim to avoid wasted cookies.) Cut into 1/4-inch-thick slices. Space 2 1/2 inches apart on baking sheets lined with nonstick baking mats (such as Slipats). Bake cookies, rotating sheets halfway through, until edges are pale golden brown, 12 to 15 minutes. Let cool on sheets on wire racks. Cookie can be stored in airtight containers at room temperature up to 2 weeks.