Today my dear friend Carol is getting married to Michael! While I couldn’t be with them all the way down in Key Largo, a little piece of me is. If you remember, I made these Boot & Guitar Sugar Cookies as part of a welcome to Nashville party for Carol early last year. I was thrilled when she requested these cookies to be part of her thank you goodies for her wedding guests. Sticking with the beach theme, I decided on these cute Starfish cookies and thought the little, square Initial cookies would be perfect. The idea to put the two together came from Glorious Treats. She even shows you step by step how to decorate the starfish cookies!

So, how’s it taste?
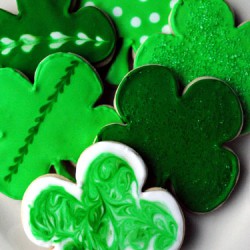
I used my go-to recipe for Vanilla Almond Sugar Cookies. They taste so good, you don’t even need the icing, but of course that makes them even better! I used a Linzer cookie cutter for the square cookies so I could get that pretty scalloped edge. The starfish worked well except they were very fragile out of the oven. I broke at least four of them (more scraps for me to eat!), but once the icing was on top, they were much more sturdier. So if you plan to create the starfish, make sure to make a few extra than what you need. My picture is a little too light above, so you can’t see the color detail in the starfish very well. The green is actually much darker and a few of the “dots” are white to really make it stand out. You can see this detail better on the Glorious Treats web site. She used sugar pearls for the big dots, but I think it’s much easier to pipe all the dots with royal icing. Carol spent the weekend with me a few weeks ago and we put the final touches on the starfish. I’d say she’s an excellent royal icing dotter! The starfish really came together once all the dots were in place. I thought they were perfect for a beach wedding treat!

The packaging turned out beautiful! Carol created the sticker from Vistaprint and I was so touched she included that they were made by me! Her wedding colors were fern green and brown and we found the perfect brown ribbon with a stitch of green going down the middle. I can’t wait to hear how her guests enjoyed the cookies!
Congratulations Carol & Mike!

photo by Dana Serling of Doodle Bug Photo

 Print
PrintStarfish & Initial Sugar Cookies
cookie recipe by Bake at 350
royal icing recipe by Annie's Eats
Ingredients:
Vanilla Almond Sugar Cookies
3 cups unbleached, all-purpose flour
2 tsp. baking powder
1 cup sugar
1 cup (2 sticks) salted butter, cold
1 egg
3/4 tsp. vanilla extract
1/2 tsp. almond extract
Royal Icing
4 cups powdered sugar, sifted
2 tbsp. meringue powder
5 tbsp. water
Directions:
1. For the cookies: Preheat oven to 350 degrees F.
2. Combine the flour and baking powder, set aside. Cream the sugar and butter. Add the egg and extracts and mix. Gradually add the flour mixture and beat just until combined, scraping down the bowl, especially the bottom.
3. The dough will be crumbly, so knead it together with your hands as you scoop it out of the bowl for rolling.
4. On a floured surface, roll out dough to 1/4" thick sheet, and cut into desired shapes. Place shapes on parchment or silpat lined baking sheets. Place entire baking sheet in the freezer for 5 minutes (this step is important in helping the cookies keep their shapes nice and clean). Remove and bake in preheated oven for 10-12 minutes or until edges are just barely starting to turn golden. Allow to cool for a few minutes on the baking sheet, then transfer to a cooling rack and cool completely prior to decorating.
5. For the royal icing: Combine all ingredients in the bowl of a stand mixer fitted with the paddle attachment. Mix on low speed until the sheen has disappeared and the icing has a matte appearance (about 7-10 minutes). Transfer the contents of the mixing bowl to an air-tight container. This will be the stiffest consistency of the icing, and at this point it is still too stiff to use for decorating. Add water a very small amount at a time and stir by hand until fully incorporated. Continue until the icing has reached a consistency appropriate for piping. (Remember, if you are having any difficulty piping, it is still too thick. Add a little more liquid and try again.) Using a pastry bag, pipe around the edges of each cookie. Let stand so the icing will set. Make sure to keep the leftover icing covered at all times when not in use so that it does not begin to harden.
6. Once all the cookies have been edged, transfer some of the remaining icing to a separate air-tight container. Thin out by incorporating a small amount of water at a time, until the icing drips off the spoon easily when lifted and then smooths in with that still in the bowl. If you go too far and the icing is too thin, add more sifted powdered sugar to thicken it again. Once the icing has reached the desired consistency, transfer it to a squeeze bottle (or a plastic bag with a hole in one corner), and flood the area surrounded by the piping on each cookie. If it does not completely spread to the edges, use a toothpick to help it along. Allow to set.
7. Use the remaining thicker icing for piping decoration as desired. Gel icing color is best as it does not add a significant amount of liquid. Liquid food coloring can be used as well – add powdered sugar as needed to compensate for any thinning that occurs.

the starfish turned out so pretty! congrats to your friends!
Why thank you!
Love it! Your royal icing on the starfish even looks like you used pearls. So pretty!
Thank you!
Holy cow!! Those are amazing. They look professional!
Thanks so much!