It got a little ridiculous in my house when I made Cheese Ravioli Carbonara. I loved it so much, I made it four times in a row. Four. Times. I had it for lunch and dinner pretty much everyday for about two weeks. I…

It got a little ridiculous in my house when I made Cheese Ravioli Carbonara. I loved it so much, I made it four times in a row. Four. Times. I had it for lunch and dinner pretty much everyday for about two weeks. I…

This quiche sounds a little weird. Ham, pineapple, ok we’re good there, but cheddar too? I don’t mind odd flavor combinations, but this one made me hesitate just a bit. However, I knew I had to make Ham, Pineapple, and Cheddar Quiche when my…

Is this not the cleverest way to serve veggies and spinach dip? I’ve been seeing these all over the web lately and thought I’d give it a try for my friend’s bridal shower. Spinach Dip with Veggies in Baguettes is not only appealing for…

I have a weak spot for chicken salad. If it’s on the menu, 9 times out of 10 that’s what I’ll order. Problem with chicken salad is that it’s easy to screw up. I’ve had my fair share of bland, chopped too fine, or…

If you remember from my sugar cookie post a little over a year ago, I used to hate sugar cookies. Then I started baking the best sugar cookie recipe and using fun cookie cutouts and icing to make a sugar cookie I’d actually eat.…

Blackberry and chocolate? Raspberry and chocolate go so well together, so why not? I created these Blackberry Chocolate Cupcakes for a lavender and purple themed bridal shower this past weekend. They were instantly my favorite out of the entire spread of food. Actually they…

Yesterday my friend Meghan and I hosted a bridal shower for our friend Allison. Allison’s getting married to Chris in one month! The colors of her wedding are different shades of purple, so we stuck with that theme and threw her a Lavender &…
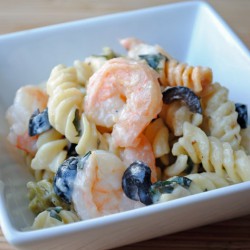
I really lucked out finding this Shrimp & Feta Rotini recipe. It’s perfect for a light meal in these Spring (er, Summer if you’re in Nashville) temperatures. Other than the shrimp and feta, you probably have most of the ingredients on hand. Make the…
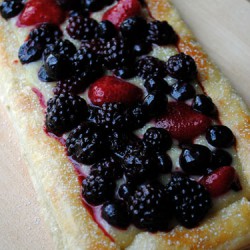
Nothing says Spring to me like a dessert filled with fruit. Tart lemon and sweet berries make this Gingered Lemon Berry Tart irresistible. The crust is simple to make using store-bought puff pastry. The filling is quickly made in a saucepan and once it…

Hi! Welcome to So, How’s It Taste! You may have found this post through Pinterest, so thanks for stopping by! If you’re interested in caramels, please check out my posts for Chocolate Chip Caramels and Salted Caramels. Hope to see you back soon! Tomorrow’s…
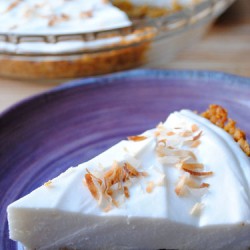
Happy Pi Day! Yep, today’s 3/14 and what better way to celebrate than with pie! (Like I need an excuse to make a pie, but I’ll use it.) I decided to make Coconut Dream Pie for the occasion. It wasn’t my first choice, but…
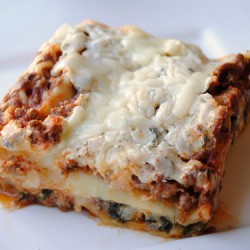
Quick Fix Lasagna doesn’t require boiling the noodles first, nor does it require special no-boil noodles. How in the world do the noodles get tender?! I think it’s from the sauce being a little on the saucy side. Using cottage cheese instead of ricotta…