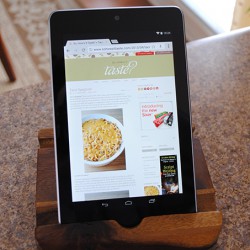
Monday, April 30, 2012

Traveling Eats: Another Broken Egg Cafe

At the end of this past January, I had the privilege of attending Food Blog South in Birmingham, Alabama, for Goo Goo Cluster. It was really cool being the Goo Goo girl for one day! Handing out chocolate made me pretty popular and I had a ton of fun meeting new friends and introducing folks to the southern candy confection. Of course, the highlight of the trip was the food. Before heading home, a few of us stopped at Another Broken Egg Cafe for brunch. One look at the menu and I knew I was going to have trouble narrowing down my decision. This place is a breakfast hot spot, but also serves burgers, salads, and sandwiches.

Blackberry Grits

So, how’s it taste?

That beauty above is Blackberry Grits. It’s the perfect size for sharing, so the whole table dug in. I’m very anti-sweet grits. I like to refer to folks that put sugar on their grits as Yankees. Grits were meant to be savory, eaten with butter, salt and pepper, and maybe a little cheese. But never sweet…until I tasted blackberry grits. They were incredible! Creamy grits, not too terribly sweet, but just enough. Bursts of fresh blackberry and on the side was a sweet butter. Even though this fed five people, I would’ve had no problem downing the entire bowl myself.

Eggs Benedict

After a torturing process of deciding what to eat, I picked Eggs Benedict. I love, love, love eggs benedict as hollandaise sauce is a favorite of mine, and you all know how I feel about runny eggs. These were served with their country potatoes. I was instantly happy with my choice. The eggs benedict were perfect and I loved the country potatoes. My only complaint is the ridiculously big serving plate. It hogged up the table and the skillet on top of the plate was unnecessary.

Plantation Quesadilla

Lucky for me, two of my friends are Birmingham locals (they recommended this place) and they love food as much as I do (and don’t mind sharing!). My friend Kevin ordered the Plantation Quesadilla. It’s a flour tortilla filled with chicken, green chiles, onions, tomatoes, and melted cheese. It’s also served with the country potatoes plus sour cream, guacamole, and salsa. If you’re looking for something savory for brunch, this is the dish to choose. The chicken was tender and seasoned just right. I’m a condiment junkie so I love all the options it comes with, plus you get those lip-smacking good potatoes. You won’t need to eat the rest of the day after this meal!

Cinnamon Roll French Toast

Last was the Cinnamon Roll French Toast that my friend Amber ordered. I was so, so glad she did! It’s a merging of two breakfast obsessions. Slices of cinnamon rolls, grilled in French toast batter, smothered with cream cheese icing, banana’s foster sauce, mixed warm berries, and whipped cream. I’ve died and gone to sugar heaven! If you’ve got a killer sweet tooth, you’ve got to try it. It’s almost too much for one person to conquer, so I was more than happy to help Amber out with a few bites. ;)

The original Broken Egg is in Mandeville, Louisiana and they’ve got several locations in Alabama, Mississippi, Florida, Georgia, California, and Texas. A recent glance at their online map and I see Tennessee is in blue for “sold.” Please, please, please let Another Broken Egg come to Nashville!

Friday, April 27, 2012

Cascal Giveaway

Not too long ago I was contacted by Cascal to try their unique, natural sodas. I was instantly curious when I found out they contain no sugar other than those from fruit juice, they’re caffeine and gluten free, and each serving is only 60 to 80 calories. Cascal comes in five flavors: Crisp White, Ripe Rouge, Fresh Tropical, Bright Citrus, and Berry Cassis. Not your usual cola, grape, or orange varieties! The samples I received had Fermented Soda printed on the cans, but online they have changed to Natural Soft Drink. I was skeptical of how they’d taste, especially the “fermented soda” part. Fermented doesn’t exactly scream delicious. Luckily, delicious is exactly how they taste!

Cascal

So, how’s it taste?

Each flavor has a suggested food pairing that I thought was pretty cool. I had every intention of following the suggestions, but I ended up enjoying most of these as a stand-alone soft drink treat. Here’s what I thought of each flavor.

Crisp White – notes of pear, apricot, and magnolia. Pairs well with Brie, strawberry ice cream, and salads.

This was the first Cascal I tried. I had it with my Brie-stuffed chicken dinner one night. It smells like apple and a hint of beer, which comes from the fermentation. It was much lighter than I expected. I see the word “soda” and I think it’s going to be syrupy, but this drink is very crisp. It was almost like drinking wine. I immediately searched where I could buy this locally (Whole Foods).

Ripe Rouge – notes of cherry, rose, and chocolate. Pairs well with Asiago, grilled beef, and chocolate cake.

It smells and tastes like mixed berries. It’s heavier on the raspberry and has a cherry candy flavor as well. This one was also light and crisp. I sampled this one with a piece (okay pieces!) of chocolate. It’s amazing with chocolate. It really brought out more of the berry flavor. There’s a slight perfumy and floral note that I noticed the more I drank. It’s still a really good flavor, but I’m not a fan of the floral notes. I think it was just telling me I needed to eat more chocolate!

Fresh Tropical – notes of mango, jasmine, and kaffir lime. Pairs well with BBQ, mango salsa & tortilla chips, and pad thai.

It smells like mango. It’s the sweetest one of the five flavors and has the least fermented flavor. This one was more like a carbonated juice as it wasn’t as crisp as the others. I really enjoyed this one and wish I had tried it with BBQ or pad thai. I can see how well they’d go together. I enjoyed this one, but I missed the fermented flavor like the others have.

Bright Citrus – notes of lemongrass, tangerine, and pineapple. Pairs well with guacamole, chicken sandwiches, and teriyaki chicken.

This one smells like a light beer and citrus. It’s very crisp and has a nice, fruity aftertaste. I could also identify carrot and pineapple. It’s bursting with fruit flavors and this one was my favorite until I tasted the Berry Cassis.

Berry Cassis – notes of black currant, tangerine, and lemon. Pairs well with hummus & pita and tandoori chicken.

This was my absolute favorite! It has a rich berry smell and prominent berry taste. I could detect a hint of grape in smell and taste as well. This one is light and crisp and reminds me of a non-alcoholic bellini.

The nice folks at Cascal want to share the tasty experience with one lucky So, How’s It Taste reader! Cascal will send the winner a case of their flavor of choice.

To enter: All you need to do is comment on this post and tell me which flavor of Cascal you’re most excited about trying.

Optional entries: For up to two additional entries, do one or both of the following and leave a separate comment for each optional entry.

1. Follow @SoHowsItTaste & @CheersCascal on Twitter and tweet the following: Win a case of @CheersCascal natural soft drinks from @SoHowsItTaste! Choose from 5 amazing, unique flavors. http://bit.ly/Cascal

2. Like So, How’s It Taste? and Cascal on Facebook.

I’ll randomly select the winner on Wednesday, May 2 at noon Central. Please make sure you enter a valid email address as an alternate winner will be chosen if I don’t hear from you within 48 hours. Good luck!

Congratulations to comment #15 from Michelle!
Winner chosen using Random.org

Wednesday, April 25, 2012

Italian Zucchini Crescent Pie

Before this Italian Zucchini Crescent Pie, I was a zucchini hater. Loved squash, but absolutely would not eat zucchini. I have no idea what made me buy zucchini for this pie instead of my beloved squash. I think I thought the green would be so much prettier and maybe I’d give zucchini another chance. Full disclosure, my only experience with it was the nasty pieces in those popular diet frozen entrees. Not exactly the best representation of any vegetable. I’m glad I gave it another try.

Italian Zucchini Crescent Pie

So, how’s it taste?

Well, I’ve happily welcomed zucchini into my life with open arms and this pie started it all. It’s creamy and gooey from the cheese and eggs, but with a slight crunch from the zucchini. The crust is delicious, as I’m a fan of crescent rolls. I really like the reduced-fat version since the original can be a bit greasy. Everything is so light with this pie. The crust, the filling, and the herbs really compliment the zucchini. Plus I really like the presentation. The sliced zucchini is so pretty and unique. The thin layer of mustard on the crust was a bit odd though. I like mustard, but it was strange to have one bite that had a prominent mustard flavor and another that didn’t. I think next time I’ll stir the mustard into the filling instead of spreading it over the crust separately. One slice is so low in calories that you can pair this with a yummy fruit salad. A fantastic lunch for Spring.

Print

Italian Zucchini Crescent Pie

Pillsbury, Recipes with Crescents, Biscuits, & More!, March 2004
makes 6 servings
per serving: 225 calories, 7g fat, 26g carbs, 1g fiber, 14g protein

Ingredients:

4 cups thinly sliced zucchini (about 4 medium)
2 medium onions, chopped (1 cup)
2 tbsp. dried parsley flakes
1/4 tsp. salt
1/8 tsp. garlic powder
1/8 tsp. dried basil leaves
1/8 tsp. dried oregano leaves
1/8 tsp. pepper
1/2 cup refrigerated or frozen fat-free egg product, thawed
6 oz. (1 1/2 cups) shredded fat-free mozzarella
1 (8 oz.) can refrigerated reduced-fat crescent dinner rolls
2 tsp. prepared mustard

Directions:

1. Heat oven to 375F. Spray 12-inch nonstick skillet with nonstick cooking spray. Heat over medium-high heat until hot. Add zucchini and onions; cook 7 to 9 minutes or until tender, stirring frequently. Stir in parsley flakes, salt, garlic powder, basil, oregano, and pepper.

2. In large bowl, combine egg product and cheese; mix well. Stir in cooked vegetable mixture.

3. Separate dough into 8 triangles. Place in ungreased 10-inch glass pie pan. Press in bottom and up side of pan to form crust; firmly press perforations to seal. Spread bottom of crust with mustard. Pour egg mixture evenly into crust-lined pan.

4. Bake at 375F for 25 to 30 minutes or until knife inserted near center comes out clean. If necessary, cover edge of crust with strips of foil after first 15 minutes of baking to prevent excess browning. Let pie stand 10 minutes before serving.

Monday, April 23, 2012

Gorgonzola Linguine with Walnuts

Oh look, it’s another pasta dish! Shocker, I know, since I never make the stuff. I really try to have a variety, but lately I’ve been lucking out with some fantastic, low-calorie pasta meals. Gorgonzola Linguine with Walnuts caught my eye instantly, but wasn’t exactly figure friendly. No problem! A few substitutions and I was in business with a creamy, cheesy pasta that I felt zero guilt about eating.

Gorgonzola Linguine with Walnuts

So, how’s it taste?

Loved it, loved it, loved it. You’ve gotta be a fan of Gorgonzola to like this one though. I happen to love the stuff, especially when paired with walnuts. This pasta doesn’t taste like you made any lower-calorie substitutions. It tastes like you’re cheating. You know it’s a good meal when that happens. The sauce is creamy and tangy from the Gorgonzola and the walnuts add a nice crunch. I opted not to toast mine (since I have a horrible track record of burning nuts) and it tasted great. I also made this dish once using pecans and it was just as tasty. This is yet another pasta dish I didn’t mind eating several days in a row.

Print

Gorgonzola Linguine with Walnuts

Betty Crocker, Easy Weeknight Meals, March 2002
makes 4 servings
per serving: 367 calories, 10.7g fat, 51.5g carbs, 2.6g fiber, 16.4g protein

Ingredients:

8 oz. uncooked linguine
1 tbsp. butter
1 clove garlic, minced
1 tbsp. all-purpose flour
1 cup fat-free evaporated milk
1/4 cup chicken or vegetable broth
1/4 tsp. salt
1/2 cup crumbled reduced-fat Gorgonzola cheese
3 tbsp. walnuts, toasted* and finely chopped

Directions:

1. Cook and drain linguine as directed on package.

2. Meanwhile, melt butter in 2-quart saucepan over medium heat. Cook garlic in butter, stirring occasionally, until garlic is golden brown. Stir in flour until smooth and bubbly. Stir in milk, chicken broth, and salt. Cook, stirring constantly, until mixture begins to thicken.

3. Reduce heat to medium-low. Stir cheese into sauce; cook, stirring frequently, until cheese is melted. Toss linguine and sauce in large bowl. Sprinkle with walnuts.

*To toast walnuts: Bake uncovered in ungreased shallow pan in 350F oven about 10 minutes, stirring occasionally, until golden brown or cook in ungreased heavy skillet over medium-low heat 5 to 7 minutes, stirring frequently until browning begins, then stirring constantly until golden brown.

Friday, April 20, 2012

Chocolate Chip Caramels

Making homemade caramels can be intimidating, but it’s actually pretty simple. This recipe for Chocolate Chip Caramels is a great one to try if you’ve never made homemade caramels. The method is a bit different from the method I like to use (see Salted Caramels or Salted Whiskey Caramels). It still works great, although I think it produces a much lighter caramel, but it’s a good place to start if you want to get into making your own caramels. We all know caramel and chocolate is a great pairing, so I think you’re going to love the chocolate chip caramels!

Chocolate Chip Caramels by So, How's It Taste

So, how’s it taste?

Buttery and sweet with small bursts of chocolate that help to balance all the sugar. These were supposed to be chocolate swirl caramels, but those mini chips just would not melt, so chocolate chip caramels were born. The little chocolate chips aren’t too sweet, so they counteract all that sugary sweetness from the caramel. I loved each bite of chewy caramel with hints of chocolate. I feel like these caramels are a bit too light, but my previous caramels have been a bit too dark, so go figure. This recipe is much, much easier for anyone new to making their own caramel. Instead of heating the sugar and corn syrup and waiting on the perfect color before you add the cream, everything is added at once. All you have to do is watch the thermometer. Super easy, but you’ll miss out on the fun of watching the sugar boil violently when adding the cream…that’s my favorite part in the other method! Either way, the end result is a gooey, buttery treat that’s irresistible.

Print

Chocolate Chip Caramels

Cooking Pleasures, December/January 2000
makes about 64 caramels
per caramel: 70 calories, 3.5g fat, 0g protein, 10.5g carbs, 0g fiber

Ingredients:

1/2 cup unsalted butter
2 cups sugar
1 1/2 cups whipping cream
1 cup light corn syrup
1/4 cup mini semi-sweet chocolate chips

Directions:

1. Line an 8-inch square pan with wax paper; spray lightly with nonstick cooking spray. Melt butter in dutch oven or a heavy, large saucepan over low heat. Add sugar, cream, and corn syrup; stir to mix. Increase heat to medium; bring to a boil, stirring frequently.

2. Insert candy thermometer into mixture and attach to side of Dutch oven. Cook, stirring frequently, until thermometer registers 230F. At this point, it is important to watch the mixture carefully. Begin stirring constantly until thermometer registers 248F.

3. Immediately pour half of the caramel mixture into pan. Sprinkle with half of the chocolate chips. Pour remaining mixture over chocolate chips; do not scrape Dutch oven. Sprinkle with remaining chocolate chips. Let stand 6 to 8 hours or until cool and set.

4. Remove caramel from pan by lifting wax paper. With large knife or pizza cutter, cut caramel into 64 pieces.

Wednesday, April 18, 2012

Sour Cream & Chive Rolls

There’s nothing like making your own bread. The smell in the house is intoxicating and these Sour Cream & Chive Rolls are no exception. I kept walking by my bread machine and peeking at the minutes left because I could not wait for them to be ready. If you didn’t know what was baking, you’d know it by the smell. If you’re a fan of sour cream and chives, this bread is for you!

Sour Cream & Chive Rolls

So, how’s it taste?

It’s so full of sour cream and chive flavor. Most times I find when I add sour cream to something that’s going to be baked, it loses that distinct sour cream flavor and sort of takes a back seat. Not these rolls. The sour cream and chives are front and center. Tangy, oniony, I just loved them. Plain homemade dinner rolls are pretty spectacular themselves, but start adding bold flavors and it’s an all new level. These rolls have a slightly different texture than my regular homemade rolls. They are still light and billowy, but almost have a coarse texture at the same time. Served piping hot (with a pat of butter if you want to splurge!), these rolls would be great with any main dish. Make a double batch and freeze them for anytime homemade bread.

I’ve included directions below for making these rolls by hand or using a bread machine.

Print

Sour Cream & Chive Rolls

Betty Crocker, Spring Celebrations, April 2001
makes 12 rolls
per serving: 150 calories, 6g fat, 21g carbs, 1g fiber, 4g protein

Ingredients:

3/4 cup sour cream
2 tbsp. shortening
2 1/4 cups all-purpose flour
2 tbsp. sugar
1 tsp. salt
1 package (2 1/4 tsp.) regular or quick active dry yeast
1/3 cup very warm water (120 to 130 degrees)
1 egg
1 1/2 tbsp. chopped fresh chives

Directions:

1. Heat sour cream and shortening over medium heat, stirring frequently, until shortening is melted. Cool about 20 minutes or until lukewarm.

2. If you're using a bread machine, measure carefully, placing all ingredients in bread machine pan in the order recommended by the manufacturer. Select Dough/Manual cycle. Do not use delay cycle. Remove dough from pan, using lightly floured hands. Cover and let rest 10 minutes on lightly floured surface. If you're making the bread by hand, mix 1 1/4 cups of the flour, the sugar, salt, and yeast in large bowl. Add sour cream mixture, water, and egg; beat with spoon until smooth. Stir in remaining flour and the chives until smooth. Scrape batter from side of bowl. Cover and let rise in warm place about 30 minutes or until double.

3. Grease 12 medium muffin cups. Bread machine method, divide dough into 12 pieces and place into muffin cups. By hand method, stir down batter by beating about 25 strokes. Spoon into muffin cups. For both methods, let rise uncovered 20 to 30 minutes or until batter rounds over tops of cups.

4. Heat oven to 400F. Bake 15 to 20 minutes or until golden brown.

Monday, April 16, 2012

Creamy Spring Pasta

I’ve been crazy for pasta lately. Actually not lately, all the time. I’m a huge pasta lover, especially if it includes a creamy, rich sauce. Usually those kinds of sauces are off limits if you’re hardcore into calorie-counting mode like me. Not this Creamy Spring Pasta. I found this recipe in Cooking Light and made it even less calories than their version! I think that deserves some kind of gold star!

Creamy Spring Pasta

So, how’s it taste?

I’ve made this twice in the last week, so that should tell you it was a great recipe. It lives up to its name with the bright green from the peas and asparagus. The veggies also add a nice texture to the fettuccine. The sauce is creamy and rich, thanks to the cream cheese. I even used REAL cream cheese, not reduced fat, and still managed to keep the calorie count low. If you want to go lower, you can certainly use less fat cream cheese. Since it calls for three ounces, I opted for the real stuff because you can buy it in a three ounce block, instead of a tempting huge chunk. Since the fettuccine is so thick, it makes for quite a hearty dish of pasta. If you want to bulk it up, shrimp or chicken would be a tasty addition. My favorite flavor is the tarragon. I’ve used dried tarragon before, but this was my first taste of fresh. It’s on a different level and really makes this dish, so don’t skip it or use dried. Fresh tarragon almost has a licorice flavor, but brighter. Don’t be turned off by that description as I hate licorice and I loved the fresh tarragon. The pasta soaks up the sauce really quickly, so if you’re making this for guests, serve it immediately. Reheating leftovers is no problem if you add a splash of milk to return it to its creamy texture.

Print

Creamy Spring Pasta

Cooking Light, April 2012
makes 4 servings
per serving: 336 calories, 11.6g fat, 44.8g carbs, 4.3g fiber, 14g protein

Ingredients:

3 quarts water
2 garlic cloves, minced
1 1/2 cups (2-inch) diagonally cut asparagus
1 cup frozen green peas
6 oz. uncooked fettuccine
2 tsp. olive oil
1/3 cup finely chopped sweet onion
1 tbsp. all-purpose flour
1/4 cup fat-free chicken broth
1 cup skim milk
3 oz. cream cheese
1 oz. Parmigiano-Reggiano cheese, grated (about 1/4 cup packed)
1/2 tsp. kosher salt
1/4 tsp. freshly ground black pepper
2 tbsp. chopped fresh tarragon

Directions:

1. Bring 3 quarts water to a boil in a Dutch oven.

2. Add asparagus and peas to boiling water; cook for 3 minutes or until crisp-tender. Remove from pan with a slotted spoon. Rinse under cold water; drain.

3. Add pasta to boiling water; cook 10 minutes or until al dente. Drain and keep warm.

4. Heat olive oil in skillet over medium heat. Add onion and garlic cloves; cook for 3 minutes or until tender, stirring frequently. Place flour in a small bowl; gradually whisk in chicken broth. Add broth mixture and milk to pan, stirring constantly with a whisk; bring to a boil. Reduce heat; cook 1 minute or until thickened. Remove from heat; add cheeses, salt, and pepper, stirring until cheeses melt. Add pasta, asparagus, and peas; toss well. Sprinkle with tarragon.

Wednesday, April 11, 2012

Cheese Ravioli Carbonara

It got a little ridiculous in my house when I made Cheese Ravioli Carbonara. I loved it so much, I made it four times in a row. Four. Times. I had it for lunch and dinner pretty much everyday for about two weeks. I don’t often make the same meals over and over unless they are that good. And I really don’t make them that many times in a row. But let’s face it, it’s cheesy ravioli in a creamy sauce…with bacon. Now you understand!

Cheese Ravioli Carbonara

So, how’s it taste?

I think it’s safe to say I fell head over heels for this dish. It’s packed with savory deliciousness and it’s incredibly simple. The original recipe includes chicken, which I used first and it was great, but it works so well without it, too. If you want to add chicken, use about one pound of boneless, skinless chicken breasts and cut them into strips. I had all the ingredients leftover from the first batch, except for the chicken and that’s what lead to making it without. I can’t begin to describe how fantastic the sauce tastes. It’s decadently creamy and has some oomph to it from the little bit of Italian dressing. Crumbled, crispy bacon and fresh basil make the ravioli super fancy and OMG the richness! This dish will knock your socks off from the first bite. It’s creamy, it’s cheesy, it’s insanely tasty, and includes bacon! I actually increased the amount of sauce in my last two batches. Now you get why I got carbonara crazy!

Print

Cheese Ravioli Carbonara

adapted from Betty Crocker, Simple Home Cooking, January 2005
makes 4 servings
per serving: 225 calories, 12g fat, 22g carbs, 1g fiber, 10g protein

Ingredients:

2 tbsp. light Italian dressing
3/4 cup chicken broth
1 package (9 oz.) refrigerated or frozen (thawed) cheese-filled ravioli
1/2 cup half-and-half
4 slices bacon, crisply cooked and crumbled
Shredded Parmesan, optional
Chopped fresh basil, optional

*You can add chicken to this dish. Use 1 pound of boneless, skinless chicken breasts and cut into strips. Cook the chicken in the Italian dressing and then add the broth and ravioli and follow the rest of the directions below.

Directions:

1. In 10-inch skillet, add dressing, broth, and ravioli. Heat to boiling over high heat; reduce heat to medium. Cook uncovered about 4 minutes or until ravioli are tender and almost all broth has evaporated.

2. Stir in half-and-half; reduce heat. Simmer uncovered 3 to 5 minutes or until sauce is hot and desired consistency (cook longer for a thicker sauce). Sprinkle with bacon, cheese, and basil.

Monday, April 9, 2012

Ham, Pineapple, and Cheddar Quiche

This quiche sounds a little weird. Ham, pineapple, ok we’re good there, but cheddar too? I don’t mind odd flavor combinations, but this one made me hesitate just a bit. However, I knew I had to make Ham, Pineapple, and Cheddar Quiche when my mom agreed to trying it. She doesn’t do “weird” food, so I thought for sure I’d get a “no way” when I found this recipe. But luckily she just doesn’t do weird on her pizza (like ham & pineapple)!

Ham, Pineapple, and Cheddar Quiche

So, how’s it taste?

We both loved it! I took the original recipe and made some lower calorie substitutions to make this more figure-friendly. The flavor did not suffer one bit. As this was baking, I kept thinking “what a pretty quiche.” The flecks of green and pink and yellow, it looks like a Spring dish. I thought it was interesting how the flavors combined into this mouth-watering, savory dish. I expected to taste a burst of pineapple or a pop of onion, but all the ingredients work together and sort of merge into this mega-flavored quiche.

When I was making this quiche, I had no intention of making it again. I thought it would be ok, but now I’ll be adding it to the rotation of dishes I repeat because they’re so tasty!

Print

Ham, Pineapple and Cheddar Quiche

slightly adapted from Betty Crocker
makes 6 servings
per serving: 296 calories, 13g fat, 30g carbs, 0g fiber, 15g protein

Ingredients:

Crust
Purchased refrigerated pie crust

Filling
1 1/2 cups reduced-fat sharp Cheddar cheese, shredded
3/4 cup cooked ham, finely chopped
3 medium green onions, sliced (3 tablespoons)
1 can (8 oz.) pineapple tidbits in juice, well drained
3/4 cup egg substitute, such as Egg Beaters
3/4 cup fat-free half-and-half
1/4 tsp. freshly ground black pepper

Directions:

1. Thaw one pie crust according to directions and place in a 9-inch pie plate. Form crust to bottom of pie plate and up the sides, tucking under any overhang. Heat oven to 350°F.

2. Sprinkle cheese, ham, onions, and pineapple in crust. In medium bowl, beat egg substitute, half-and-half, and pepper until blended. Pour into crust.

3. Bake 40 to 45 minutes or until knife inserted in center comes out clean. Let stand 10 minutes before serving.

Thursday, April 5, 2012

Spinach Dip with Veggies in Baguettes

Is this not the cleverest way to serve veggies and spinach dip? I’ve been seeing these all over the web lately and thought I’d give it a try for my friend’s bridal shower. Spinach Dip with Veggies in Baguettes is not only appealing for the food table, but it makes getting dip and veggies a cinch. No more holding up the line waiting on someone to scoop out dip and grab their veggies!

Spinach Dip with Veggies in Baguettes

So, how’s it taste?

The spinach dip is the classic recipe from the packet of vegetable soup mix. You know the one. I love it because it’s so creamy and has such a great crunch from the green onions and water chestnuts. I love the flavor boost from the vegetable soup packet, too. It takes no time to mix together. The biggest task is draining the spinach.

Depending on how many baguettes you’re making, you may have dip leftover. Save it for a midnight snack, or use it on a turkey sandwich. It’s a great spread with deli meat!

You’ll want to use skinny baguettes for this. The baguettes I used were a bit on the large side, but they worked ok.

Baguette Step 1

First, cut the rounded end off the baguette. To figure out where to cut the baguette, I lined up two pieces of veggies to eyeball how tall I’d need the baguette. You’ll want to cut the baguette just a bit shorter than the two veggie sticks.

Baguette Step 2

Next, cut the baguette at a diagonal. I turned the baguette on its side for this since my baguette was a bit wider than normal.

Baguette Step 3

Now you have two pieces. If the bottom is too thick, you can cut a bit off. You want enough to hold the dip, but not a huge chunk of bread.

Baguette Step 4

With your hands, pull out the inside of the baguette. Leave the bread in the bottom though. You want to mostly pull the bread out of the sides and back. (Save the pulled out bread and pulse in a food processor for breadcrumbs! Store in the freezer.)

Baguette Step 5

Last, press the bottom bread down. This will form a sturdy base to hold the dip. Spoon in the spinach dip (as much or as little as you like) and add the veggie sticks.

Print

Spinach Dip with Veggies in Baguettes

Spinach Dip by Knorr
makes 4 cups
This is the recipe for the full-sized dip. You may not need the full recipe as it depends on how many baguettes you make and how much you fill them. You may want to start by making half the recipe first.

Ingredients:

10 oz. package frozen chopped spinach, thawed and squeezed dry
16 oz. sour cream (reduced fat ok)
1 cup mayonnaise (reduced fat ok)
1 package Knorr® Vegetable recipe mix
8 oz. water chestnuts, drained and chopped
3 green onions, chopped (optional)
baguettes
veggie sticks

Directions:

1. Combine all ingredients and chill about 2 hours.

2. In the meantime, follow the step by step pictures above to prepare your baguettes.

3. First, cut the rounded end off the baguette. To figure out where to cut the baguette, I lined up two pieces of veggies to eyeball how tall I'd need the baguette. You'll want to cut the baguette just a bit shorter than the two veggie sticks.

4. Next, cut the baguette at a diagonal. I turned the baguette on its side for this since my baguette was a bit wider than normal.

5. Now you have two pieces. If the bottom is too thick, you can cut a bit off. You want enough to hold the dip, but not a huge chunk of bread.

6. With your hands, pull out the inside of the baguette. Leave the bread in the bottom though. You want to mostly pull the bread out of the sides and back.

7. Last, press the bottom bread down. This will form a sturdy base to hold the dip. Spoon in the spinach dip (as much or as little as you like) and add the veggie sticks. Use any leftover bread for breadcrumbs or homemade croutons.

8. Fill each baguette with spinach dip. Add your choice of veggie sticks.