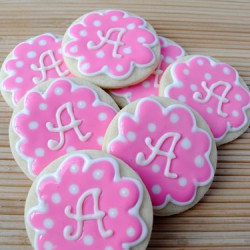
I’ve had my eye on tackling Monogrammed Sugar Cookies for a while, I just needed an occasion. Yeah, I could’ve done a bunch of “L’s” for Leah or “S’s” for the blog, but that’s not as much fun as surprising someone with a batch of decorated cookies. When I found out my friend David’s wife, Tessa, was pregnant with their second child, I knew these cookies would be perfect! After learning they were having a girl, I was really really excited and (impatiently) waited on her name. Alyse Claire (Aly) will be making an appearance in a few months and these are the cutest sweet treats to welcome her into the world!

So, how’s it taste?
I don’t have to tell you how awesome these vanilla almond sugar cookies taste. They’re my go to recipe anytime I want to make decorated sugar cookies. I like to roll them out a tad bit on the thick side so they stay chewy. I wasn’t upset when a few of these cookies didn’t look up to par and I had to eat them, I just had to.

I used a circle-shaped cookie cutter and instead of piping around the edge, used a scalloped design. I figured piping a circle wouldn’t come out so even and the scalloped edges were really easy. I flooded the pink icing inside and then added dots of white while the icing was still wet.

The monogram is simple. Use melted almond bark and trace the letters from a printed sheet of letters. Set them in the fridge to harden and easily peel them off wax paper when you’re ready to use them.

I didn’t want Aly’s big brother Rylan to feel left out, so I made him some cookies, too.

I think he enjoyed them! Is that a cute kid or what?

Packaging is 50% of the fun for me as well. I put two cookies each in a clear bag and tied them with either a pink ribbon for Aly’s cookies or a green ribbon for Rylan’s.

All packed into a simple white square box with polka dot tissue paper and ta da, ready for delivery!
 Print
PrintMonogrammed Sugar Cookies: A is for Aly
cookie recipe by Bake at 350 via Love & Olive Oil
royal icing recipe by Annie's Eats
Ingredients:
Vanilla Almond Sugar Cookies
3 cups unbleached, all-purpose flour
2 tsp. baking powder
1 cup sugar
1 cup (2 sticks) salted butter, cold
1 egg
3/4 tsp. vanilla extract
1/2 tsp. almond extract
Royal Icing
4 cups powdered sugar, sifted
2 tbsp. meringue powder
5 tbsp. water
Monogram
Almond bark
Directions:
1. For the cookies: Preheat oven to 350 degrees F.
2. Combine the flour and baking powder, set aside. Cream the sugar and butter. Add the egg and extracts and mix. Gradually add the flour mixture and beat just until combined, scraping down the bowl, especially the bottom.
3. The dough will be crumbly, so knead it together with your hands as you scoop it out of the bowl for rolling.
4. On a floured surface, roll out dough to 1/4" thick sheet, and cut into desired shapes. Place shapes on parchment or silpat lined baking sheets. Place entire baking sheet in the freezer for 5 minutes (this step is important in helping the cookies keep their shapes nice and clean). Remove and bake in preheated oven for 10-12 minutes or until edges are just barely starting to turn golden. Allow to cool for a few minutes on the baking sheet, then transfer to a cooling rack and cool completely prior to decorating.
5. For the monogramming: Find a font and size you'd like to use that fits your cookies. I used Microsoft Word and held up the cookies to my screen to gauge if the font size would fit. Print a sheet of the letters. Place the printed sheet on a cookie sheet and cover with a sheet of waxed paper. Melt one to two squares of almond bark in the microwave according to package directions. Transfer to a piping bag, fitted with a #2 tip. Trace the letters onto the waxed paper (make more than you'll need as some could break). Place cookie sheets in the fridge to harden the letters.
6. For the royal icing: Combine all ingredients in the bowl of a stand mixer fitted with the paddle attachment. Mix on low speed until the sheen has disappeared and the icing has a matte appearance (about 7-10 minutes). Transfer the contents of the mixing bowl to an air-tight container. This will be the stiffest consistency of the icing, and at this point it is still too stiff to use for decorating. Add water a very small amount at a time and stir by hand until fully incorporated. Continue until the icing has reached a consistency appropriate for piping. (Remember, if you are having any difficulty piping, it is still too thick. Add a little more liquid and try again.) Using a pastry bag, pipe around the edges of each cookie. Let stand so the icing will set. Make sure to keep the leftover icing covered at all times when not in use so that it does not begin to harden.
7. Once all the cookies have been edged, transfer some of the remaining icing to a separate air-tight container. Thin out by incorporating a small amount of water at a time, until the icing drips off the spoon easily when lifted and then smooths in with that still in the bowl. If you go too far and the icing is too thin, add more sifted powdered sugar to thicken it again. Once the icing has reached the desired consistency, transfer it to a squeeze bottle (or a plastic bag with a hole in one corner), and flood the area surrounded by the piping on each cookie. If it does not completely spread to the edges, use a toothpick to help it along.
8. To add dots: Pipe small dots into the wet icing. They'll "sink" into the icing after a few seconds. To add monogram: Peel monograms off the wax paper and place on cookie while the flooded icing is still wet. Allow to set.
You ROCK.
No, you rock! You made my day!
So cute, GREAT job!
Wooow, this are great!! I love it!
I love the look of these! And the packaging is so cute! Awesome job.
These cookies are delicious and almost to cute to eat! I love every single detail you put into them It was like opening presents on Christmas morning….. Such a SWEET surprise! Thank you so much!
Tessa, David Rylan & Aly
You’re so welcome! Congrats again on the baby girl! I’ll have to make another sweet treat when she gets here!
Wow! These look terrific and I love that you spelled out all the directions so clearly. Even I think I could make some of these. Thanks!
You sure can! It’s easier than it looks!
Hi Leah
This is life saver as I have to do some baby shower favors and I am totally going to use this but my question is…
What did you use for doing the scalloped edge Almond bark? and second for the middle part you used royal icing?
Thanks in advance
Hi Glory! I only used almond bark for the letters. The edge on the cookies, the flooded icing all over, and the dots are done with royal icing. Have fun!
Hi,
Do you use royal icing to glue the letter to the cookie?
Hi Gabriela, I put the monograms on the cookie while the flooded icing is still wet and it stays put.
When you are outling the letters, can you use Royal Icing instead of the Almond Bark….
Yes, you can!
About how long does it take for the icing to be completely hardened and able to package? And are they OK to be left uncovered overnight in order to harden up? Thanks!
Hi Christa!
I don’t know an exact time, but it’s actually pretty quick. Once you’ve done a few cookies and moved on to the next batch, you’ll find that the first cookies you did are already hardened or close to it. I’ve never left them out overnight, so I’m not sure if it would dry out the cookie or not.