Living in Nashville, it’s easy to have a quick getaway to Chattanooga for the weekend. A two-hour drive east on I-24 (plus the time zone change) lands you in downtown Chattanooga with plenty to see, do, and eat! In August, we did just that…

Living in Nashville, it’s easy to have a quick getaway to Chattanooga for the weekend. A two-hour drive east on I-24 (plus the time zone change) lands you in downtown Chattanooga with plenty to see, do, and eat! In August, we did just that…
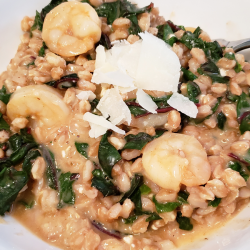
We all own an Instant Pot by now right? 👍 I’ve had mine about 3 years and I still love it. I’m always on the lookout for new recipes (other than risotto, which by the way I need to blog that recipe!) and I…

What’s comfort food for you? A hearty stew? A brothy soup? For me, it’s macaroni and cheese and I had no idea how good it could be until I stumbled on this recipe for Butternut Squash Mac & Cheese! Yeah, it sounds a little…

These Walnut-Topped Ginger Drops were the surprise favorite from Cookie Baking Day 2018. I chose this recipe because I like to have a good variety of cookies, or else I end up with all chocolate! I thought these were so unique with the candied…

Y’all. This sandwich. The Ultimate Breakfast Sandwich. I don’t know where to begin other than telling you to read the recipe, go to the grocery store, and make the garlic butter tomato sauce so you have all the ingredients for the best breakfast of…
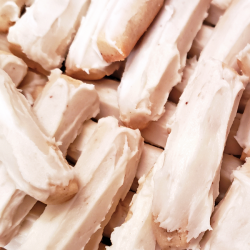
Oh, hi! (waves) Yep, I know it’s January and we’re all thinking about eating healthier, but I want to talk about cookies! As most of you know, my mom and I bake several batches of cookie each year known as Cookie Baking Day. It’s…

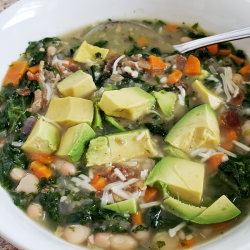
Happy New Year! I hope 2019 has been treating you well so far. Did you make resolutions? Have you broken any? 😉 I made a few including baking more, especially bread! On January 1, I made Black-Eyed Peas & Greens in my instant pot…
Is it fall where you are? Not here in Nashville. We’ve had weather in the 80s and 90s STILL. I’m thinking if I keep making cold weather meals, I can will fall weather this way south. This is the second weekend in a row…
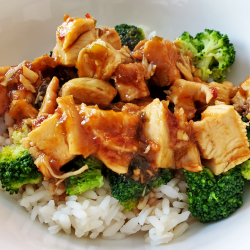
Are y’all in love with the Instant Pot as much as I am? When anyone asks me if they should buy one, my answer is always yes! And, if you use it for nothing else other than to make risotto, it’s worth the money.…
Welp, it was bound to happen eventually, but I’m surprised it was with this challenge. March’s challenge was to practice yoga once a week and stretch everyday. Sounds easy enough, but I failed at it…miserably. What happened? Read on. To catch up, read this…
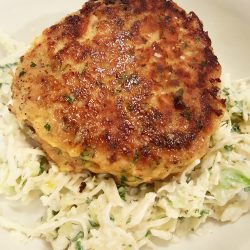
If you’re looking for a quick, but super tasty dinner, you’re going to love this recipe. I couldn’t wait to make these Salmon Burgers with Slaw. Super easy and super fast! Canned salmon and bagged slaw make this a cinch to put on the table…

Last weekend I attempted King Arthur Flour’s March Bakealong challenge and documented the step-by-step process through Instagram Stories. I love making bread from scratch, so I jumped at the chance to make Swiss-Stuffed Crusty Loaves! I substituted Swiss for Gruyère – similar taste, way…